

 It is only your donations that keep this website going. If we've helped you, please pay the favour forward and help others by keeping this content alive. You can do this by clicking here and donating. Thank you, for whatever you decide to give.
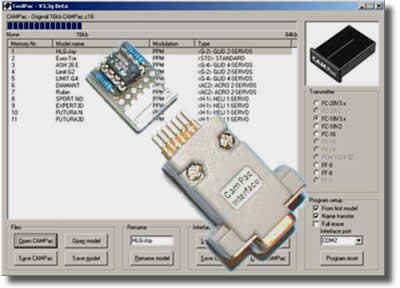
- ToolPac can read, backup and edit a Campac, or Campac clone like Clonepac, Mempac or Ultrapac, which is a very useful thing. There are tools out there that you can buy which will allow you to backup your Campac, but they are overpriced in my opinion and most use ToolPac anyway. Toolpac is an excellent piece of software and hardware, it is free, easy to make, can be updated to work with USB and, most importantly of all, works well every time. Why even consider any of the other options? Check the feedback in forums across the web if you do not believe me.
 Toolpac was not developed by me and I can take no credit for it. However, none of the links now work on the the developers web site and I couldn't find it anywhere else on the net so I'm making it available here as I have had so many emails asking if I have a copy. You do not need specialist electronics knowledge and tools to make it - just a soldering iron. You can order the components from Farnell, RS Online or similar as they are widely available and it'll cost you a fraction of the price.
 - Before downloading ToolPac please read the sections below as they contain useful information you'll need for building the ToolPac interface and (if necessary) converting that interface to work with modern USB ports.
- ToolPac consists of a hardware interface (that you build) and some software that you install on a Windows computer. The hardware interface is very simple and cheap (far less than £10) to build and does not require any special electronics knowledge or skills except the ability to solder. The hardware interface can be built for a COM port or a Parallel port, but with some extra kit you can build it to work with modern USB ports.
- Before downloading ToolPac please read the sections below as they contain useful information you'll need for building the ToolPac interface and (if necessary) converting that interface to work with modern USB ports. You can find the ToolPac download at the bottom of the page.
 ToolPac is designed to work through the serial or parallel port of your PC. On the face of it this presents an issue for modern equipment that often lacks these ports and instead uses USB. However, this is easily solved, and the software will work through USB with a simple "USB to COM" or "USB to Parallel" cable/adapter. This cable or adapter can be bought for around £7 from Ebay, so it is extremely cheap. This adapter will create a virtual COM port on your PC that you use in exactly the same way as if you had a real COM port. You then just plug this adapter into the ToolPac interface you have built and direct the ToolPac software to point at your virtual COM port in the same way as if you had a real COM port. That's it, your ToolPac will now work with your USB port - no special skills required!
- The ToolPac hardware interface is very simple and essentially is just a means of dropping the voltage from your COM or Parallel port to 5v with a smoothed voltage regulator so that the Campac doesn't burn out. In electronics speak it is a simple logic level shifter. The ToolPac software then sends signals to your COM or Parallel port (you select it) and the hardware interface just shifts them down to 5v and passes them on to the Campac. As such the hardware interface is just a bunch of resistors and capacitors (for smoothing), some diodes (for stopping current flowing the wrong way), and a 5v voltage regulator (for shifting to 5v and allowing external power to be added by the way of a 9v battery). You also need a Sub-D 25 pin connector (Parallel port connector) or a Sub-D 9 pin connector (COM port connector) and of course a 0.1" PCB header (row of pins for connecting to the Campac). The 7-15v and GRD connector shown in the schematic is just a 9v battery connector with a 9V battery attached to it - very simple. All in all there are only 14 components and most cost around 20p even if bought from your local electronics shop!
- The schematic for connecting all these components is shown below - do not be daunted by it! If you can wire an ESC to a motor you can build the interface as it isn't any harder. If you don't know what all the symbols mean then just type "electronic symbols for schematics" into Google as there are plenty of crib sheets. The values shown against each symbol are the ratings for that part and you'll need to by components with similar values. Do not worry, these are all very common components and can be bought just about anywhere.
- Please click the button below to download ToolPac, but make first you have read and understood the information on this page. The download contains instructions for building the hardware interface as well as containing the ToolPac software, these are packed in an Zip archive to save space and bandwidth. Most versions of Windows will open this Zip archive as if it were a folder, but if your copy of Windows fails to open it, then simply download 7Zip, Winrar or a similar Zip archive tool from the internet.
PLEASE SUPPORT US |
| If we helped save you money, please pay the favour forward and help support the upkeep of this site and its guides for others. Just click a button below. |
 |
 |
 |
| Big thanks from us for your help! |