


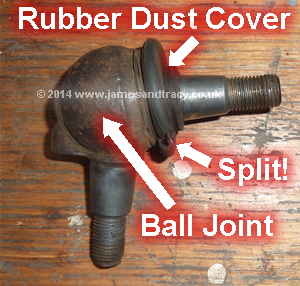
 When a suspension lower ball joint fails you will typically first hear a "clunk" noise as you drive your Mercedes E-Class over bumps, you will also see uneven tyre wear on the affected wheel. As things get worse over time, that "clunk" will turn into a "bang" sound and your steering will become sloppy. The usual failure mode for these ball joints is through dirt getting into the "ball". This happens because the rubber dust cover is split through a one-off "suspension pinch" or just becomes old and degraded. As a result it is worth sticking your head under the car every 6 months and checking these rubber dust covers for splits and cracks, as they're far cheaper to replace than the whole ball joint. This guide also describes how to replace these dust covers.
 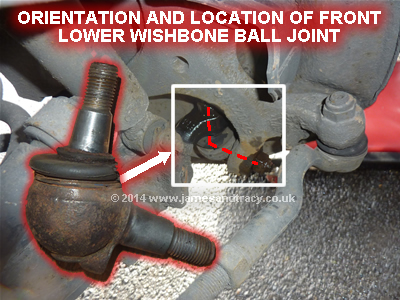 This procedure describes how to replace and repair the lower suspension ball joint on your Mercedes E-Class. This is a quick and simple job, plus suspension parts are built to take some serious abuse so you are very, very unlikely to brake anything even if you are seriously clumsy. Anyway, the lower suspension ball joint is attached to the lower suspension wishbone and the hub spider (that holds your hub) at the front of your car by two bolts (see photo). It is located directly behind and below the car's brake disc, in line with the wheel hub. It's function is to both allow the car's wheels to rotate for steering and at the same time allow the suspension to flex up and down for bumps in the road.
 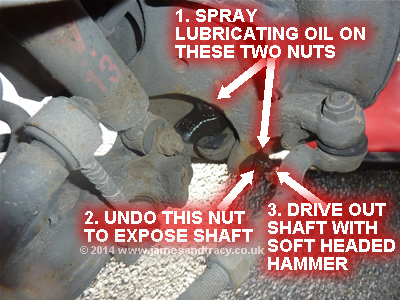 . Then remove the nut you can access (2) which may require you to apply some serious force (this is where a breaker bar or extension handle is useful, if you don't have one you can use a tube over the end of your spanner or socket handle). Finally, drive out the ball joint stud from the spider using a soft headed mallet (3). This can require some serious hammering, but you must be careful not to damage the threads that hold the nut you've just removed if you intend to repair the ball joint (hence the reason for a soft headed mallet). A good tip here is to put the nut back on the stud and screw it up until the tip of the stud is level with the outer face of the nut - this provides more surface area to hit and reduces the chance of damage. If you do not have a soft headed mallet you can use an old piece of carpet to protect the stud/nut and use a standard mallet or hammer. Of course if you are replacing the ball joint with a new one, then you do not need to worry about damaging the threads. Once removed the lower suspension wishbone will drop a little (1cm), but not much and there is no need to support it with a jack as it is not under pressure from the spring.
 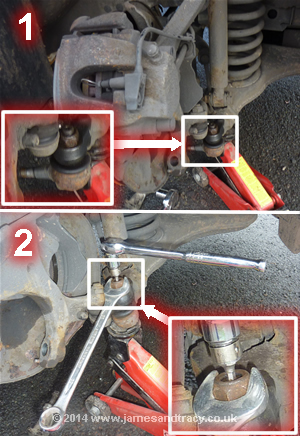 With the ball joint's stud removed from the spider you will be able to swing the whole hub/spider/brake disc assembly out of the way to gain access to the second nut (see photo to the left). Be careful when you do this not to place too much tension on the black rubber brake hose that goes to your caliper or the two electrical wires. You may need to unhook or unplug these electrical wires to gain full access. Once you have access you need to remove the exposed nut. This stud and nut goes to the inner ball on the ball joint and may start swiveling as you remove it making undoing the nut difficult. As a result there is an Allen key socket in the head of the stud to allow you to hold it still (see photo to the left). However, don't use the Allen socket yet as breaking the seal will be helpful in removal at this stage so you actually want the stud to rotate in the socket. Of course once the seal has broken and the joint has started to rotate then use an Allen key to hold it still and remove the nut fully. If the seal does not break you will need to hammer out the stud like you did in Step 2. You will now have removed the lower ball joint and you will be able to take it away for repairs or replacement.
 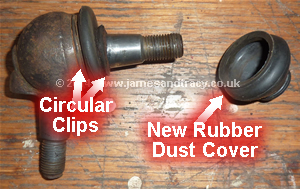 . However, if the ball joint has yet to fail (i.e. no "clunk" noise) and you are only replacing a split or degraded dust cover, then you need to remove the old cover by prizing off the circular metal clips (top and bottom, see photo). Once the cover is off, clean out the ball joint with a rag and then squeeze some fresh grease into the ball. Finally, squeeze some grease into the new dust cover and refit it with the circular metal clips. You can get replacement dust covers online (see photo to the right), but perhaps the easiest and cheapest way is to pop along to your nearest independent garage. These guys buy dust covers in all sizes in bulk and will be very likely just to give one to you as they see them as disposable items! Of course before you fit your newly repaired ball joint, give it a good clean up with a wire brush (be careful of the rubber dust cover!) and smear a little copper grease on the studs and threads to prevent them seizing in future.
PLEASE SUPPORT US |
| If we helped save you money, please pay the favour forward and help support the upkeep of this site and its guides for others. Just click a button below. |
 |
 |
 |
| Big thanks from us for your help! |
Please share your knowledge. |
| Many people have already helped others through this site by contributing information and techniques. If you have something you want to contribute, please click here to contact us. You'll be credited on this site and you'll have shared what you know to help the community. |
| Thanks to all who have contributed |
 It is only your donations that keep this website going. If we've helped you, please pay the favour forward and help others by keeping this content alive. You can do this by clicking here and donating. Thank you, for whatever you decide to give.