

 It is only your donations that keep this website going. If we've helped you, please pay the favour forward and help others by keeping this content alive. You can do this by clicking here and donating. Thank you, for whatever you decide to give.
- This guide describes how to remove your Mercedes instrument cluster (panel or console) and how to easily, cheaply and professionally make the special tools required that will do the job without damaging your car. Removal of the instrument cluster is often required to repair simple issues like repairing fading LCD screens including the clock and temperature displays (click here for a repair guide), or for replacing the instrument panel bulbs (click here for a guide on quick and cheap bulb replacement). You may also need to perform this procedures to fix issues (e.g. handbrake light) that might otherwise cause you to fail the MOT, click here for a handy pre-test MOT checklist. Following this instrument cluster removal and replacement you may need to reset and resynchronise your electronics if you are experiencing issues with some of your accessories (e.g. windows, wipers etc.). This is a quick and simple procedure and you'll find a complete list of Mercedes electronics reset and resynchronisation procedures in this guide (click here). Although this guide is for a 1996-2001 Mercedes E-Class it should apply in general to pretty much any variant or model that uses simple push-in consoles with little or no modification. For example, the C-Class has clips that need to be pushed up by the special tool described in this guide, but removal of the cluster is otherwise the same procedure.
- Finally, some acknowledgements: There is a huge amount of information on the web, and some excellent guides. Without this information I would never have restored my E-Class' interior electrics so easily. However, all of the information is not in one place and many of the guides are incomplete, inaccurate or contain unnecessary and risky procedures. So I decided to write some guides (like this one) to fill in those gaps!
- The removal procedure should take a couple of minutes. If you need to make the special tools as well you should allow yourself 10 mins for the whole removal job. Refitting will take a little longer, give yourself 10 mins as you will need to reset and sync your car's electrics with the ECU.
- There is virtually no risk if you follow this procedure. However, just like walking across the road there is always some risk, even if it is tiny. Do not let this put you off as you'd be running the same risk if you took the car to the dealers to have it fixed, it's just that this way they won't be the ones deciding how much to charge you for putting things right if they go wrong. Anyway the risks are:
- 1. Breaking your console is a remote possibility whenever you work on an instrument panel, no matter what you're doing and even if you're only removing it. This could potentially cost you more than £100 to put right.
- 2. Disconnecting the battery presents a very small risk of permanent issues in some of your car's electrics that cannot be reset except by a Mercedes dealer or by replacing the part. However, this risk is purely anecdotal and there is no record I can find that "without doubt" proves these issues can happen (they have not happened to me). Where people say that things have gone wrong appears to only encompass minor, but irritating (and sometimes costly), failures of non-essential equipment. Most of the issues that occur can be corrected quickly and easily by resyncing or resetting the various electrical systems. You can find a guide on how to resync and reset your Mercedes E-Class electronics by clicking here.
- Minimise that Small Risk - Get prepared and take precautions
- The most important precaution is to always disconnect the car battery (despite some advice on the internet elsewhere). Never skip this step. Voltage is supplied to the console at all times when the battery is connected, pulling and connecting live wires is not a good thing for PCBs as you risk causing a damaging voltage spike. Yes, you'll probably get away with it if you don't, but why risk it? The reason why some people advise on leaving the battery connected is to avoid the glitches that need to be reset in windows and sunroof after the car's ECU boots back up - but the reset procedures are easy and the risk of rare permanent glitches that can only be reset by a dealer are far smaller than the risk of damage through connecting a live wire.
- The E-Class W210 instrument panel is a simple push fit into the dashboard like many of their other models. It is a tight fit and you will need special pullers to remove it without scratching or damaging the interior. Bent coat hangers and similar DIY tools will not be strong enough to do the job safely. You can buy special mercedes pullers or the cheaper generic panel manipulation hooks, but why bother when you can make the tool quickly and easily for nothing? It'll also fit the gap better and work more safely than the generic hooks you can buy at a reasonable price. All you need to do is get your hands on some thin, sprung steel, but where can you find that? Fear not, there is a simple answer..... windscreen wipers!
-
 First you need to find an old-style windscreen wiper - if you don't have an old one lying around the garage, your neighbors probably will, and if not most garages will have a selection thrown away in their rubbish. Once you have found a windscreen wiper you need to check it for a sprung steel strip. This is located at the back of the wiper rubber (see photo), is very strong and is perfect for making tools. I always keep my old windscreen wipers until I have harvested the steel for this reason. You will find that it is the perfect width and thickness for slipping into the narrow gap between the trim and the instrument panel in your Mercedes, is very strong and it's also been nicely shaped to remove all the sharp edges so there is no danger of scratching your trim. Most wipers have this sprung steel strip, but not all, so keep looking. Once you have one, just unclip the blade to remove the steel.
 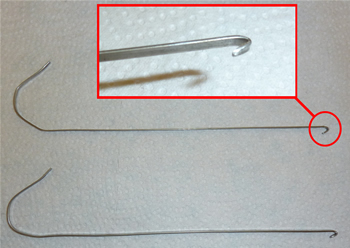 Now you just need to cut and bend the steel to make your Mercedes instrument panel puller. The length of the shaft of the puller should not be less than 10 cm. The hook is simply a small sharp bend in the end. You may want to file your hook so that it neatly fits the grooves in your panel, but it is strong enough that this is not necessary. In all cases bend a handle into the end of your puller to give you the purchase you need to pull hard enough. Oh and remember to de-bur and smooth any cuts you make with sandpaper to prevent any chance of damage to your trim. That's it, have a look at the photo and make some, they take about 5 mins to make.
- The E-Class W210 instrument panel is a simple push fit into the dashboard like many of their other models, so this approach will work for other Mercedes models like the C - Class as well with some small modifications.
- 1. Important Preparations
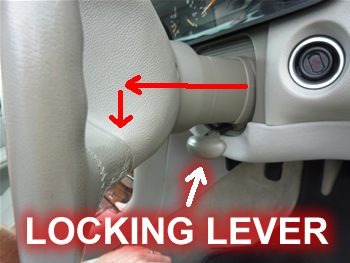 Before doing anything make sure you have the security code for your stereo - you'll need it as you'll be removing the battery shortly. Also it is important to turn the car on and centre the steering wheel to provide enough access to remove the instrument cluster from behind it. Make sure your windows and sunroof are closed - this is very important for re-syncing the electronics without any chance of an issue. Now, if you have an adjustable steering wheel, you should also lower and then pull it out to its fullest extent after releasing the locking lever (see photo). Finally turn all your electrics off ( e.g. stereo). That's it as far as preparation, just make sure the car is off and the keys are removed from the ignition and in your pocket (not in the car!) before proceeding to the next step. Never leave keys in a car when you are about to disconnect/reconnect the battery as sometimes it can trigger the central locking.
- 2. Disconnect the 12v battery
- The E-Class W210 has a single battery, but other models may have an auxiliary back up battery as well. Only ever disconnect the main battery as the auxiliary back up is there to supply constant power to the car's computer memory and retain settings. The W210 get's round this problem by having non-volatile memory retained by a super-capacitor instead of a back up battery.
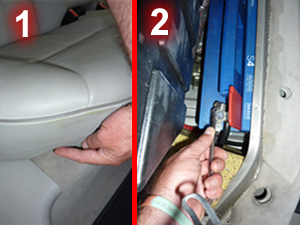 Anyway, to get access to the main car battery you need to remove the rear lower seat panel. There are clips under the seat panel on either side by the passenger doors - you need to press these clips up. The seat will now be free to be flipped up and slid out to reveal the battery in its base on the drivers side of the car. You may need to flip up some sound insulation to see the battery. Once the battery is exposed remove the negative cable by undoing the retaining bolt on the clasp and pulling the clasp from the battery. You only need to remove the negative cable from the battery (I was swapping out the battery at the same time so I removed both positive and negative cables).
- 3. Pull out the instrument cluster
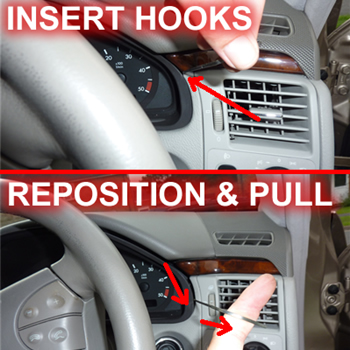 Removal is a simple process of inserting and hooking the Mercedes instrument cluster pullers into the recesses in the console and pulling it out. You should insert them at either side of the instrument cluster where the trim strip is located (see photo), then slide them down to the corners of the console. This is where your DIY mercedes instrument cluster pullers really excel as they are thin and smooth enough to slide easily into position. The instrument cluster can be a very tight fit, so before pulling make sure the hooks are in the correct position and firmly seated in the hidden recesses at each corner (you should feel them engage and hold firm when you pull gently). You may need to alternately pull one side then the other to "wiggle" the instrument cluster out of the dashboard.
- 4. Disconnect instrument cluster cables and fully withdraw cluster
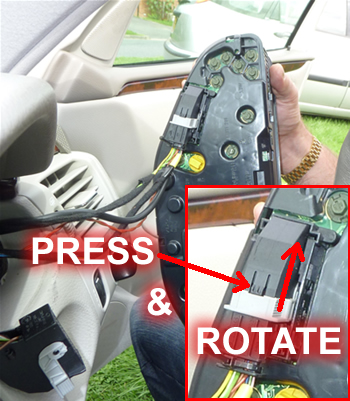 You will now need to remove 2 cables from the back of the cluster to fully remove it from the console/dashboard. These cables have a release "clip lock and rotate" retaining mechanism so do not just yank them out or you will break them. First the locking clip at the back of the cable plug needs to be depressed. Once depressed the rotating arm that holds the plug to the socket in the cluster needs to be rotated forwards. As you rotate the arm forwards the plug will withdraw itself (no pulling by you required) from the socket. Refitting the cables just requires placing the cable in position with light pressure and then rotating the locking arm back to the locked position which will automatically re-engage the plug in the socket. Both cables have unique plug pin layouts so you cannot fit the wrong plug to the wrong socket on reassembly. However, it is worth noting which cable goes to which socket at this point as it will aid swift reassembly. Once both cables are removed the whole instrument cluster can be removed from the car.
 - Whatever the reason you have removed the instrument cluster, now you have it out you should consider whether you need to fix the LCD display, convert to LED bulbs or replace any bulbs . If you have issues or intentions in any of these areas you should consider doing it now. You can find the procedures for bulb upgrade and replacement and LCD pixel repair below:
- 1. How to replace E-Class instrument cluster bulbs cheaply or upgrade to LED bulbs.
- 2. How to repair E-Class instrument cluster LCD displays with missing pixels or segments.
- Refitting the instrument cluster is simply a reversal of the above procedure for removal. However, when you're pushing the cluster back into the dashboard be careful not to trap any of the cables. Once you have everything back in and connected up you need to reset your electrics in several key areas such as the BAS, electric widows and sunroof. If you followed the above steps carefully the windows and sunroof should be already closed, but if not you'll need to manually close your sunroof before you can reset it.
- How to reset and re-sync your electronics
- For the full guide on resetting and resyncing your Mercedes just click here, but usually you don't have to do everything. So here are the common issues and how to solve them: Once everything is back in place, close all the car doors and start the car. You will immediately get a couple of malfunctions from BAS and ABS - don't panic and don't worry, this is normal. The ESP needs to be recalibrated and the ABS has junk in its memory that will be gone the next time you start the car. To recalibrate the ESP you need to slowly turn your steering wheel from full left lock to full right lock a couple of times. Next you need to re-sync your electric windows and sunroof. If you do not re-sync them then Summer Opening (Global opening and closing) from your key fob will not work and neither will the automatic widow opening when you fully depress the window switches. To re-sync simply open each window / sunroof to its fully open position with the window switch partially depressed (full switch depression will not work until the windows are re-synced). Then close the window fully and continue holding down the switch for a further 2 once it has reached the close position to store it in the car's memory. Once every window has been opened and closed in this way everything should be back to normal. To resync the sunroof open it fully and continue holding the switch for a further 1 second to store the position in memory. Finally, if you have electrically adjustable headrests on your seats, you need to resync them by moving the seat completely forward and the head rest fully down, and holding the respective buttons for two seconds in this position. Turn off the car, turn it back on and see if this is the case - all issues and malfunctions should be cleared. If Summer Opening still doesn't work then check you haven't accidentally left a door partially open. If there are still problems see this guide on resetting and resyncronising additional electronics (click here).
How to make the tools you need quickly and remove your E-Class instrument cluster safely.
PLEASE SUPPORT US |
| If we helped save you money, please pay the favour forward and help support the upkeep of this site and its guides for others. Just click a button below. |
 |
 |
 |
| Big thanks from us for your help! |
Please share your knowledge. |
| Many people have already helped others through this site by contributing information and techniques. If you have something you want to contribute, please click here to contact us. You'll be credited on this site and you'll have shared what you know to help the community. |
| Thanks to all who have contributed |