

 It is only your donations that keep this website going. If we've helped you, please pay the favour forward and help others by keeping this content alive. You can do this by clicking here and donating. Thank you, for whatever you decide to give.
- Making a cider press yourself isn't hard, but it does take a little effort and some basic woodworking tools. Once you have one you can make cider or perry (pear cider) and many other fruit based drinks. You can make a press for around £20 using odds and ends. The single biggest spend will be for the stool to place it on while you press, but if you don't have one already, one of these can be bought from somewhere like IKEA for £12 and you'll also be able to use it for other things. Commercial presses start at £140 and for something of a practical size you'll be paying nearer £200. Then you have to buy the scratter to mash the apples for the press... it can be a very expensive game, which is not really in the spirit of traditional cider making. So why not make your own equipment if you don't want to spend that kind of money? It really is easy.
- The guide for making a serious hobbyist's cider press is on this page, and if you click here you can find a guide and plans for making a scratter (fruit pulper), which you will also need to make cider or perry. If you want to know how to use both to make your own cider you can click here for a simple and traditional cider recipe or if you click here you can find out how to make your own perry (pear cider).
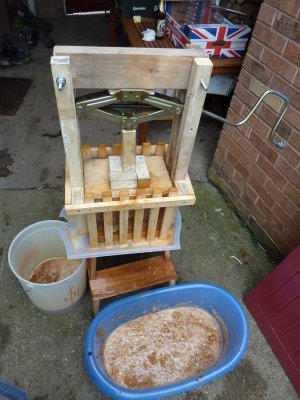 There are 5 basic components to your cider press (see pictures):
- 1. The cider press itself (which you will make)
- 2. The plastic tray with a side cut out to catch the juice (which you will buy)
- 3. The stool to put the press on while you press (which you may already have)
- 4. The bucket or container to catch the juice as it runs off the tray
- 5. The piece of net curtain you'll use to wrap the fruit scrat in while pressing
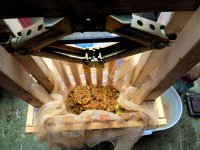
- Basically, you put the cider press on the tray. Put both on the stool. Place the bucket where you've cut the hole in the tray for juice run off, then wrap the fruit scrat (remember you need a scratter as well as a press) in the net curtain off-cut to make a cheese and start pressing. The juice will run out of the press, be caught by the tray, run out of the hole in the tray and into your bucket or container. Job done. Modifying the tray is easy. Remember to buy one that will fit the base area of the press you are going to make, so the press can sit firmly on it. Also buy one with as deep/high sides as you can get. Finally make sure it is made of cheap plastic so you can modify it. Now, at one of the shorter sides, cut away a slot in the side to provide a channel for juice to run off the tray. That's it, your tray is ready, now onwards and upwards to making the press.
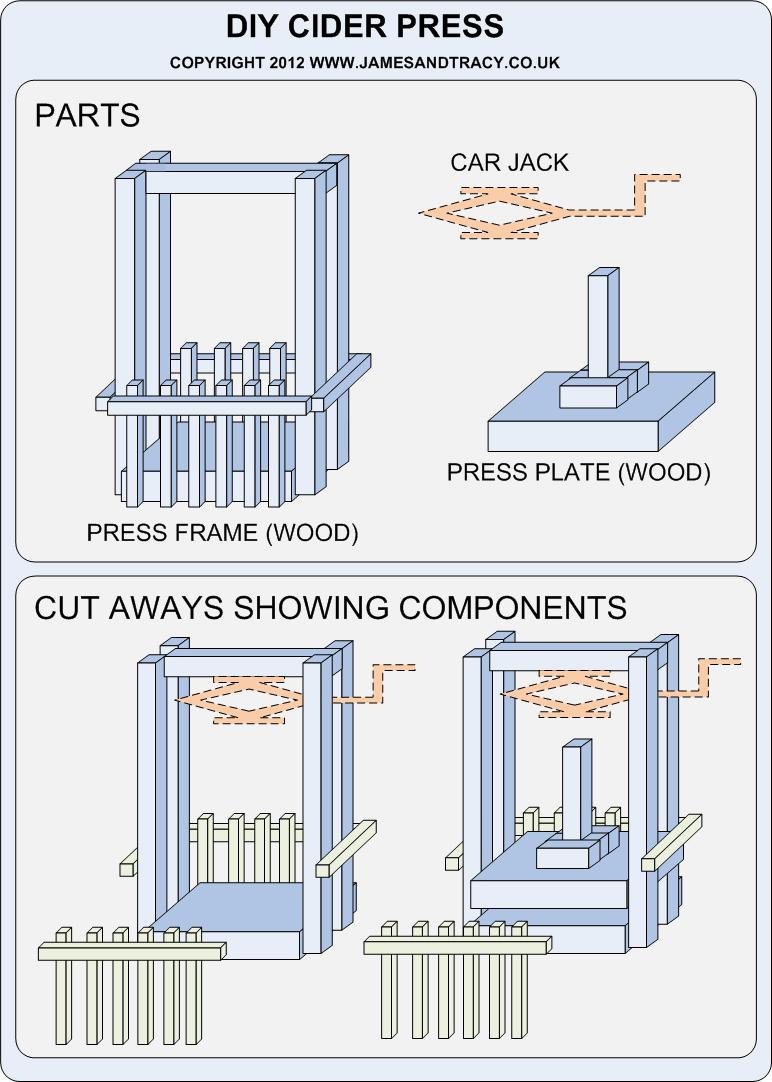
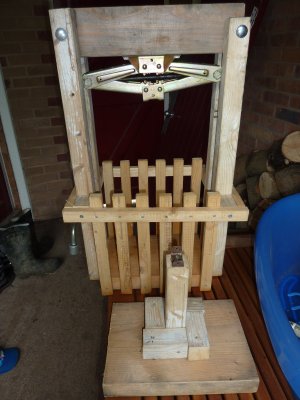 There's not a lot to this, other than have a look at the pictures below and build to the dimensions of your plastic tray. The concept (and it works well) is that 2 heavy pressing surfaces are pushed together by a car scissor jack (you could also use a bottle jack). Do make sure your pressing surfaces and the load bearing frame are from solid enough wood. My pressing surfaces are 40mm thick and the load bearing frame is 40mmx40mm post. The side panels (fence post style) do not carry any real load and are only there to constrain the cheese (fruit wrapped in net curtain). Also make sure you use good bolts or screws for the assembly - I use coach bolts in the upper load bearing frame and heavy duty screws at the base (x3 each side). Also do not forget the big load bearing cross member at the top. I'd really recommend that you do not use 40x40mm posts as you did for the sides as you may not get away with it. Instead use the same 40mm thickness wood that you used for the pressing plates - that should be plenty thick enough. In all cases, be careful when pressing as that car jack can exert a couple of tons - easily enough to break any press in two, so listen for creaking and groaning!
How to make your own fruit press for cider, perry and just about anything else.
PLEASE SUPPORT US |
| If we helped save you money, please pay the favour forward and help support the upkeep of this site and its guides for others. Just click a button below. |
 |
 |
 |
| Big thanks from us for your help! |
Please share your knowledge. |
| Many people have already helped others through this site by contributing information and techniques. If you have something you want to contribute, please click here to contact us. You'll be credited on this site and you'll have shared what you know to help the community. |
| Thanks to all who have contributed |