

 It is only your donations that keep this website going. If we've helped you, please pay the favour forward and help others by keeping this content alive. You can do this by clicking here and donating. Thank you, for whatever you decide to give.
- This guide describes how to replace instrument bulbs cheaply with OEM parts or modify your Mercedes instrument panel (dash board or console) to take LED lighting. Although this guide is for a 1996-2001 Mercedes E-Class it should apply in general to pretty much any variant or model (C-Class, later E-Class etc.) To replace bulbs or upgrade to LEDs you will need to remove the Mercedes instrument cluster, so if you also have fading pixels on your instrument cluster LCD displays (a common problem) you should consider fixing them at the same time - click here for how to fix the pixels on Mercedes LCD displays.
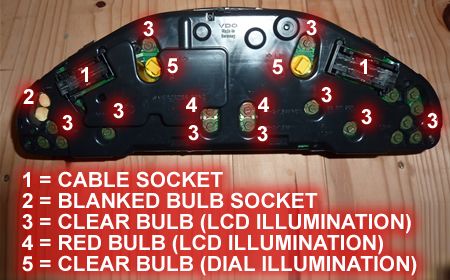
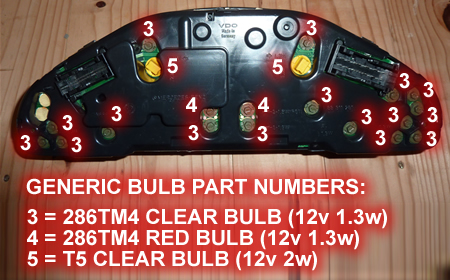
- The mercedes instrument cluster has up to 22 bulbs in total depending on your car's features, but most cars have only 20 bulbs.
 There are 3 different types of bulb in the instrument cluster - these are easily identifiable from the caps they have on them which are yellow, green and brown. The yellow cap is not fixed permanently to the bulb and you can replace just the bulb. The brown and green caps have their metal contacts soldered to the bulb and you should replace the whole bulb/cap assembly. You may of course find you have other "colours" in your dash when you get it out, this is quite usual as there are many different colour coded variants of the bulbs that will fit and at a push some mechanics will choose to fit a bulb they have rather than order one in. Because of the space behind the instrument cluster when it is fitted into place you can also get away with fitting non-standard bulbs in the 286T range as long as they are rated at 12 volts and have a wattage rating the same as or slightly below that of the standard bulbs. However I would only recommend this as a last ditch emergency approach, besides it's as easy to buy standard bulbs as non-standard.
 -
Mercedes OEM Bulb Part Numbers
Bulb Type Description Function Rating Quantity T5 Yellow cap, push-fit bulb Lights instrument dials 12v 2w 2 286TM4 Green cap, fixed bulb LCDs and warning lights 12v 1.3w 16-18 286TM4 (Red bulb) Brown cap, fixed bulb LCD warning messages 12v 1.3w 2 Note: The "real" OEM bulbs are by OSRAM, but any quality bulb will work fine.
- OEM Instrument Panel Bulbs Replacement (the inexpensive way!)
-
Instrument Bulb Cost Comparison
Bulb Type Dealer High street Shop Internet Branded Internet Quality OEM T5 £4.99 £2.58 £1.50 80p 286TM4 £3.49 £1.99 £1.23 60p 286TM4 (Red bulb) £3.49 N/A £1.23 60p Note: Figures are from personal experience - Price per bulb in the UK in Aug 2013.
- Converting to LEDs - Should I upgrade my instrument lighting to LEDs?
- OK this is only my personal point of view, but let me say straight off that unless you intend fancy things with the colour of your lighting, LEDs offer little benefit. In fact, in my view, they are a downgrade. There are a few things to consider when making this decision as LEDs cost significantly more and are non-standard equipment:
- 1. Is non-standard lighting going to trigger a malfunction? Well, the good news is that on my late model E-Class W210 the instrument lighting does not appear to be linked into the malfunction warning system, so you're probably OK here.
- 2. Will the bulb dimmer function on the instrument cluster still work? Yes, but not very well. LEDs barely dim through most of the range and then in a very narrow range will dim to nothing. LEDs are not very linear in their response to voltage changes unlike your OEM bulbs. You should also note that LED special effects (colour changing or pulsing LEDs) may not work at all when dimmed.
- 3. Does LED lighting offer a maintenance free solution? It's true LEDs will last longer, but standard OEM bulbs will last around 5-10 years so this is not really a benefit in this case.
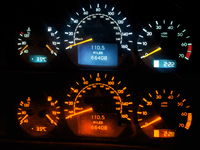
- 4. Will LED lighting make my instrument dials appear clearer? No, it'll actually make them less clear and this is a significant drawback of aftermarket LED upgrades. LED lighting is very directional so you will get "points of light" around where the bulbs are located. This is even the case with LED cluster bulbs that are designed to mimic the diffuse lighting effect that you get from the OEM bulbs.
- 5. Will LED lighting make my instrument cluster look better? Maybe, this is a personal thing. Some people like the "points of light" effect you get with LEDs. Also if you want to change the colour of your instrument lighting then LEDs certainly offer the greatest choice that's most readily available. You can even get colour changing LED bulbs and pulsing LED bulbs. At fancy effects LEDs excel. However, different colour OEM bulbs are also available and you can even paint clear OEM bulbs with glass paint to match whatever colour you choose (although this will make them dimmer).
- 6. Does LED lighting offer a cheaper solution in the long run compared to OEM bulbs? No. You can easily spend £80 converting a whole cluster with quality LED lighting. Similar quality OEM lighting would cost around £15 for the whole cluster or £5 for glass paint if you just wanted a colour change. LEDs are significantly more expensive and you will never make up the cost difference in the long run.
- Converting to LEDs - The parts you will need to upgrade your instrument lighting to LEDs
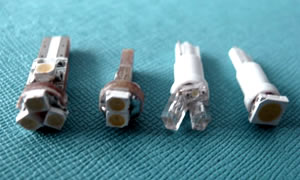
- There are several options to consider when upgrading your instrument lighting to LEDs. In all cases, because of the unidirectional lighting effect from LEDs, you should purchase LED cluster bulbs that are designed to mimic the distributed lighting effect of standard bulbs or you may not be able to read your dials and warning lights at night.
 This is particularly important with the bulbs for the LCDs, which look terrible if you use standard LED bulbs. One important thing to remember is that LEDs are voltage directional, get their contacts the wrong way round and they will not light up. As a result when you come to fit them test the instrument panel lighting before fitting it back in the dashboard so you can then rotate the contacts on any LEDs that do not function.
 - The simplest but most expensive way is to purchase a set of LED bulbs tailor made for the Mercedes and similar instrument panels. The T5 bulbs are simple push fit clusters, the 286T bulb replacements come either ready made with the green cap or you can purchase the cap separately. There are several suppliers on the web for these parts.
- By far the cheapest way (and the only way if you want lighting effects like pulsing) is to purchase generic LED cluster bulbs and use your old bulb's caps. You just need to search Google for T5 or 286T LED bulbs to get hold of the parts which are very widely available. If you're using this approach check how far the bulb protrudes into the instrument cluster and be sure you have enough room to fit it. As a rule of thumb be wary of LEDs with a protruding bulb lengths much greater than that of the original part (~10mm for 286T and ~12mm for T5 bulb types). The yellow T5 bulbs are easy as you can simply withdraw them from the caps. You can also re-use the original 286TM4 green and brown caps, but you need to extract the old bulb and re-solder the new LED in place. This is not difficult, using a small screwdriver (to help slide up the metal contacts if necessary) and a pair of needle nose pliers (to gently hold the bulb and wiggle/pull it out) you can extract the bulb and contact assembly from the green cap. All you need to do now is desolder the old bulb from the contacts and re-solder them to the new LED before fitting it back into the cap.
 If you are changing the colour of your lighting with LED instrument bulbs, then you should consider changing your dial faces and gauge needles. If you leave the OEM dial faces and needles on your gauges these are coloured and may clash with your chosen scheme. There are plenty of suppliers on the internet of after-market dial faces for your E-Class and a few even stock after-market needles for the gauges Both are easily fitted. The needles on your gauges are a friction fit and can be carefully levered off to replace your dial faces. When you refit the needles you should carefully push them back into place until you feel them click home. You will need to open up your console to gain access to replace the dial faces and needles, but you can find the procedure for disassembling your instrument cluster by clicking here.
 - If you haven't already read the information in the above sections, please do so. The replacement procedure is simple but you do need to be prepared.
- How long does it take?
- Instrument bulb replacement is easy and quick (10 mins). Upgrading to an LED instrument cluster may take a little longer depending on the method you choose.
- What's the Risk? What could go wrong?
- Both replacing bulbs and upgrading to LEDs require you to remove the instrument cluster, so there is a tiny risk things could go wrong. This risk really is very, very small and it should not put you off. However, if you make a big mistake or get massively unlucky you may get the exciting opportunity of driving a Mercedes without a working console so follow the steps in the procedures carefully.
- Procedure to replace your instrument cluster bulbs
- 1. Before you start make sure you have identified which bulbs have blown and have the replacements you require. If you are replacing all the bulbs in your dash with OEM variants make sure you have a few more bulbs than you need. If you have decided to convert to LEDs then this is not necessary. Make sure you also have a clean workbench and a small (4mm) flathead screwdriver or socket set handy as you'll need these for removing the bulbs.
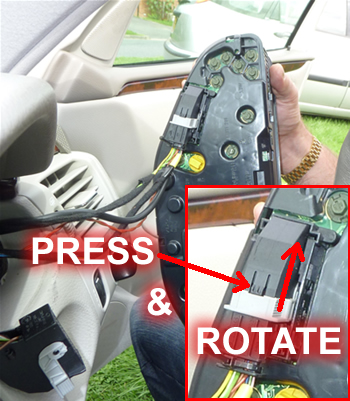
 You also need to make sure you have the relevant tools for removing your instrument cluster. You can buy Mercedes instrument cluster removal tools online, but simple and more effective alternatives can be made very easily - click here to see this guide on how to make some . Either way, do not use coat hangers (they bend and damage the car), but make sure you do have some instrument cluster removal tools handy as they are essential. Also, as you will be removing the instrument cluster from the car it is a good idea to fix any issues you have with missing pixels on your multifunction display LCDs at the same time (click here for a guide).
 - 2. Remove the instrument cluster from the dash board or console. This is a simple push fit into the dash board, click here for a step by step guide on how to remove the instrument cluster from your Mercedes.
- 3. If you followed the guide referenced in step 2 you should have a disconnected instrument cluster sitting on your workbench. The instrument bulbs can now be replaced by rotating them anti-clockwise until their lugs align with the holes in the PCB and they slide out. Green and brown capped bulbs can be rotated with either a screwdriver set into the slot in the back, or a socket that fits their hexagonal cap. The yellow capped bulb is large enough to either be rotated with your fingers or with a pair of needle nosed pliers. You can now disassemble the yellow capped bulbs by withdrawing the bulbs from the holders. The green and brown capped bulbs are soldered together and so the bulb cannot easily be withdrawn from the cap and they must be replaced as a whole assembly. You should check each and every bulb on the instrument cluster as bulbs can be "cold" blown by removing the cluster from the vehicle. If you do not have a multi meter to check them with you can hold them up to a light and see if the filament is broken.
- 4. Refitting the bulbs is just a reversal of removal. Put the capped bulb back in the hole in the PCB and then rotate it clockwise until you feel its lugs align with the lug holes in the PCB. Push down against the spring action seat in the bulb (so it is snug with the PCB) and continue to rotate the bulb clockwise for another 90 degrees.
 5. You can now reassemble the instrument cluster in the E-Class by following this guide (click here). If you have converted to LEDs it is a good idea to test the instrument cluster lighting before pushing it back into the dash board. To do this, reassemble to this point in the guide and connect the cables, but do not push the cluster back into the dash board. Instead, reconnect the car battery, put the key in the ignition and turn the car lights on. Any LEDs that do not work will need to be removed and rotated in their sockets by 180 degrees. You should disconnect the battery again if you find any that do not work before removing the cables from the cluster. However, once you are satisfied that all your LEDs work there is no real need to disconnect the battery again before pushing the cluster back into the dashboard.
Replace the instrument bulbs cheaply on your Mercedes and upgrade to LED lighting.
PLEASE SUPPORT US |
| If we helped save you money, please pay the favour forward and help support the upkeep of this site and its guides for others. Just click a button below. |
 |
 |
 |
| Big thanks from us for your help! |
Please share your knowledge. |
| Many people have already helped others through this site by contributing information and techniques. If you have something you want to contribute, please click here to contact us. You'll be credited on this site and you'll have shared what you know to help the community. |
| Thanks to all who have contributed |